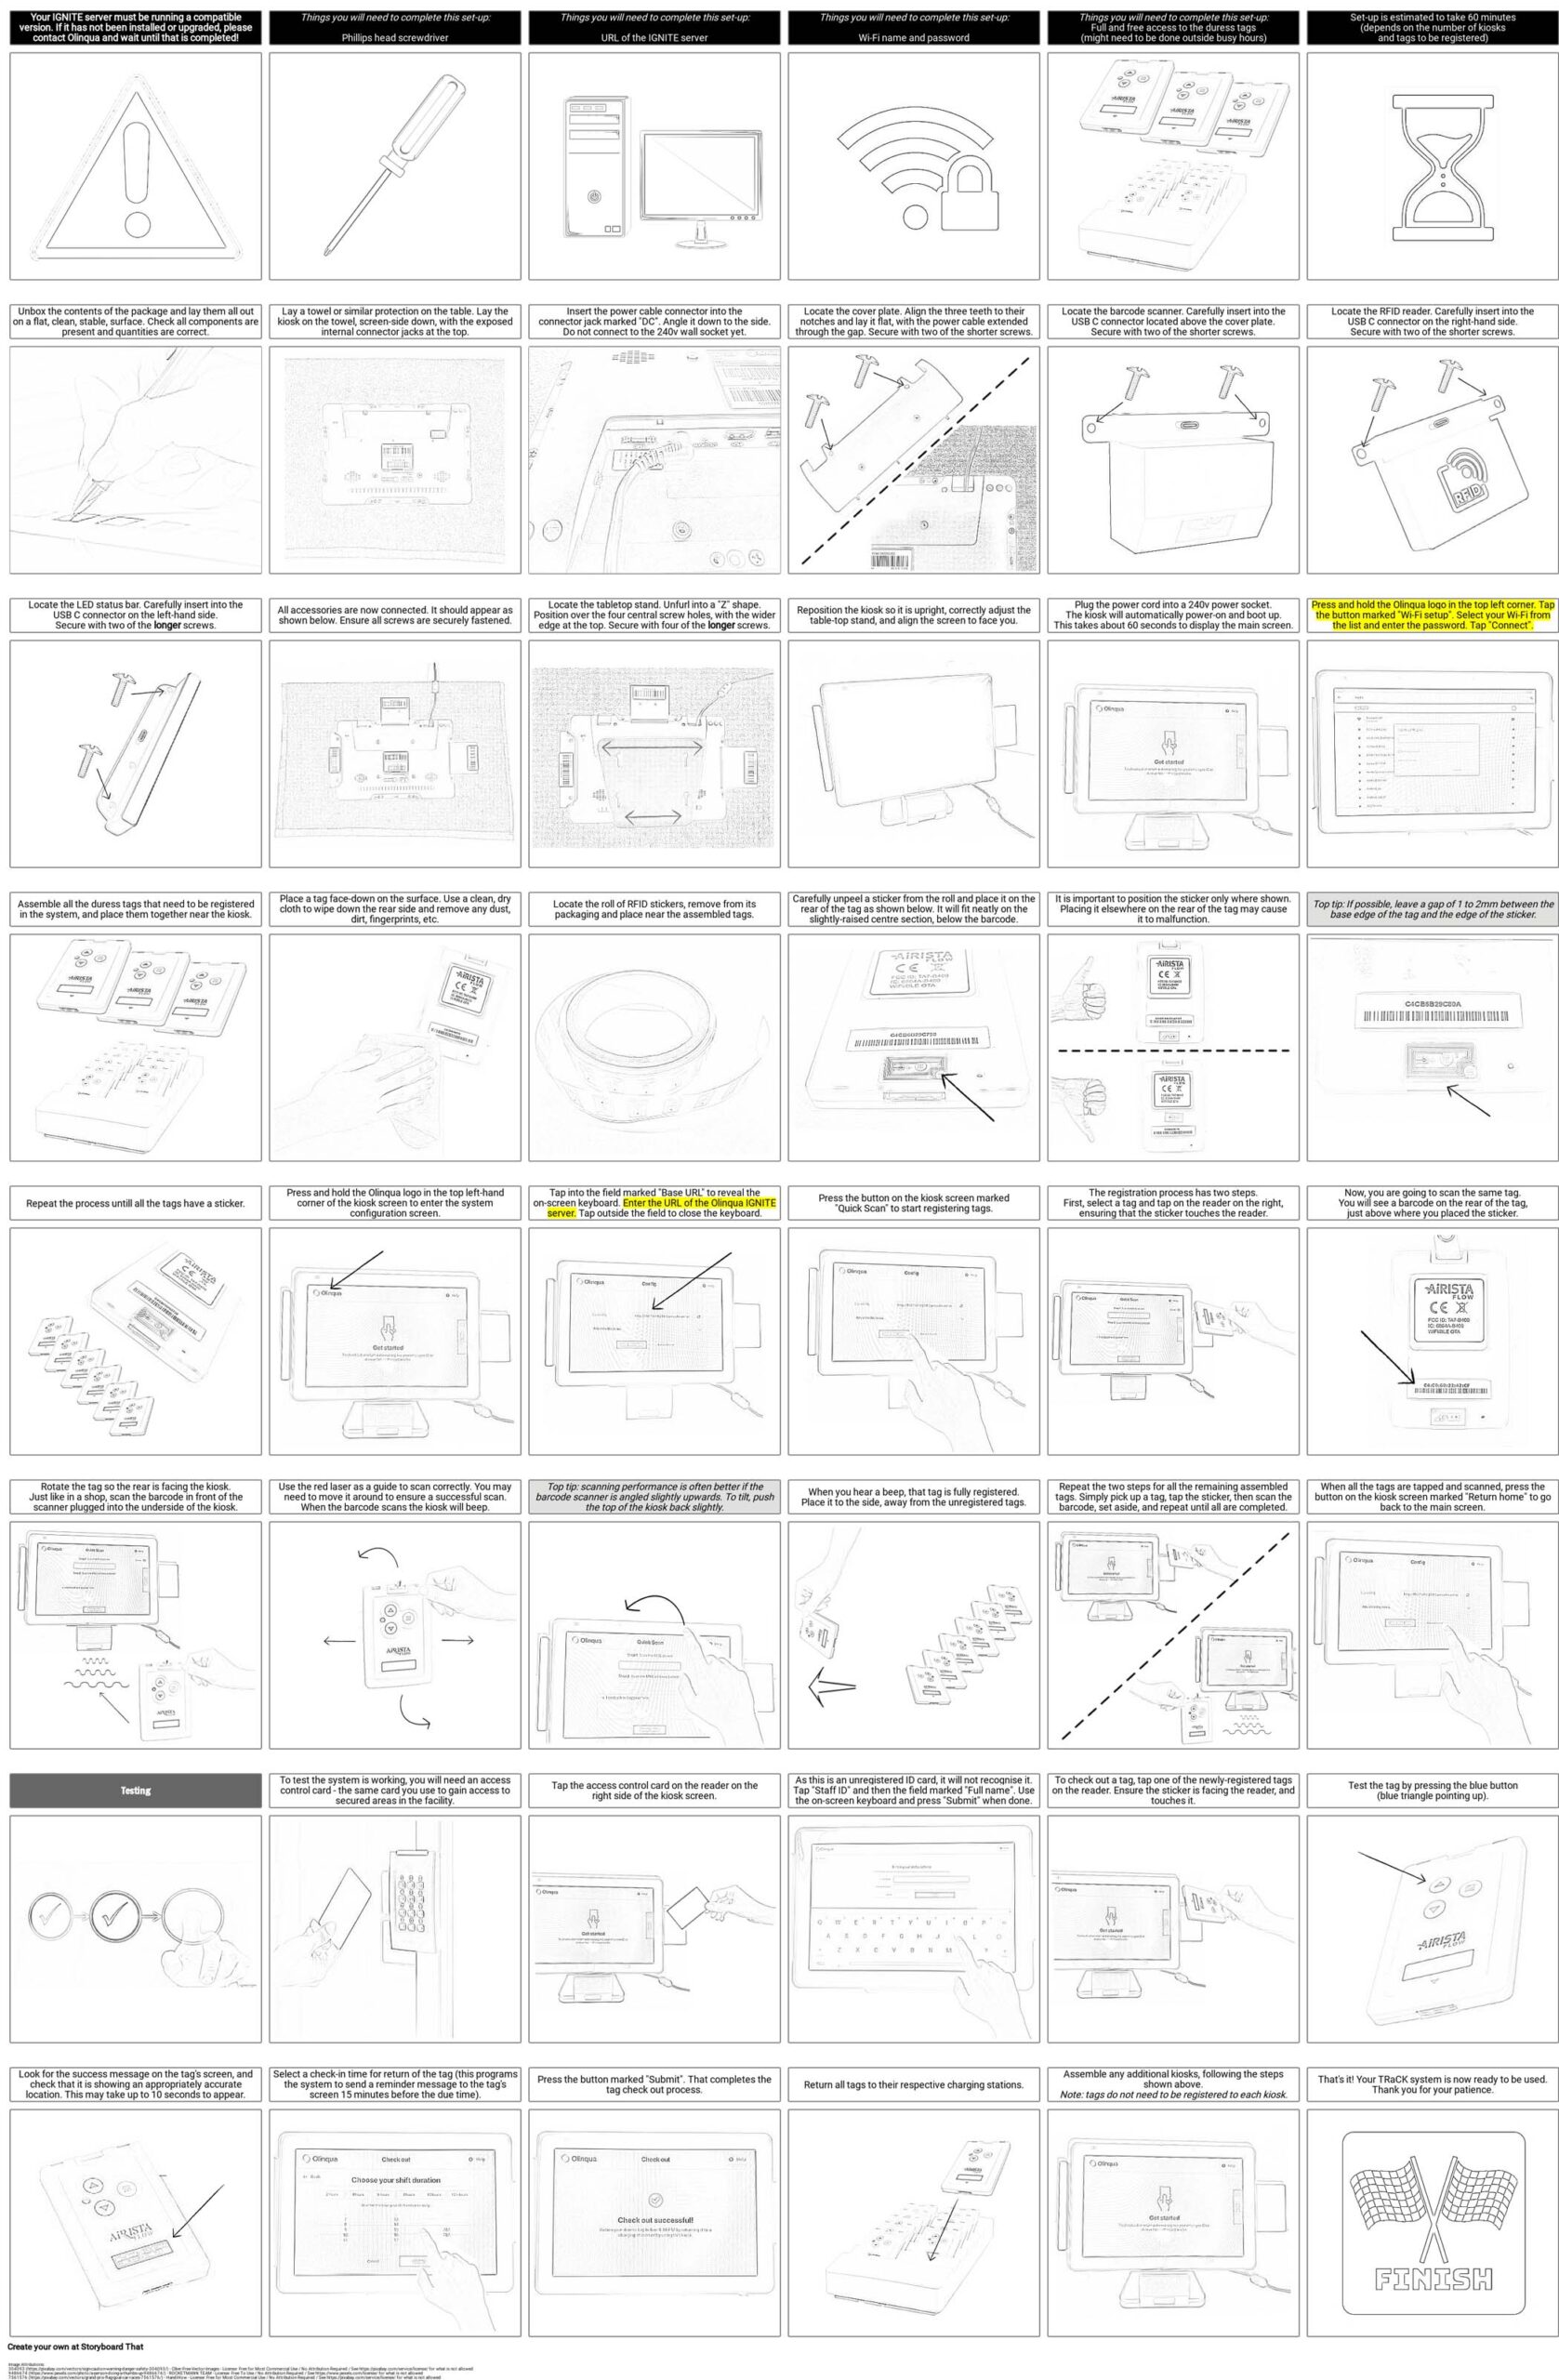
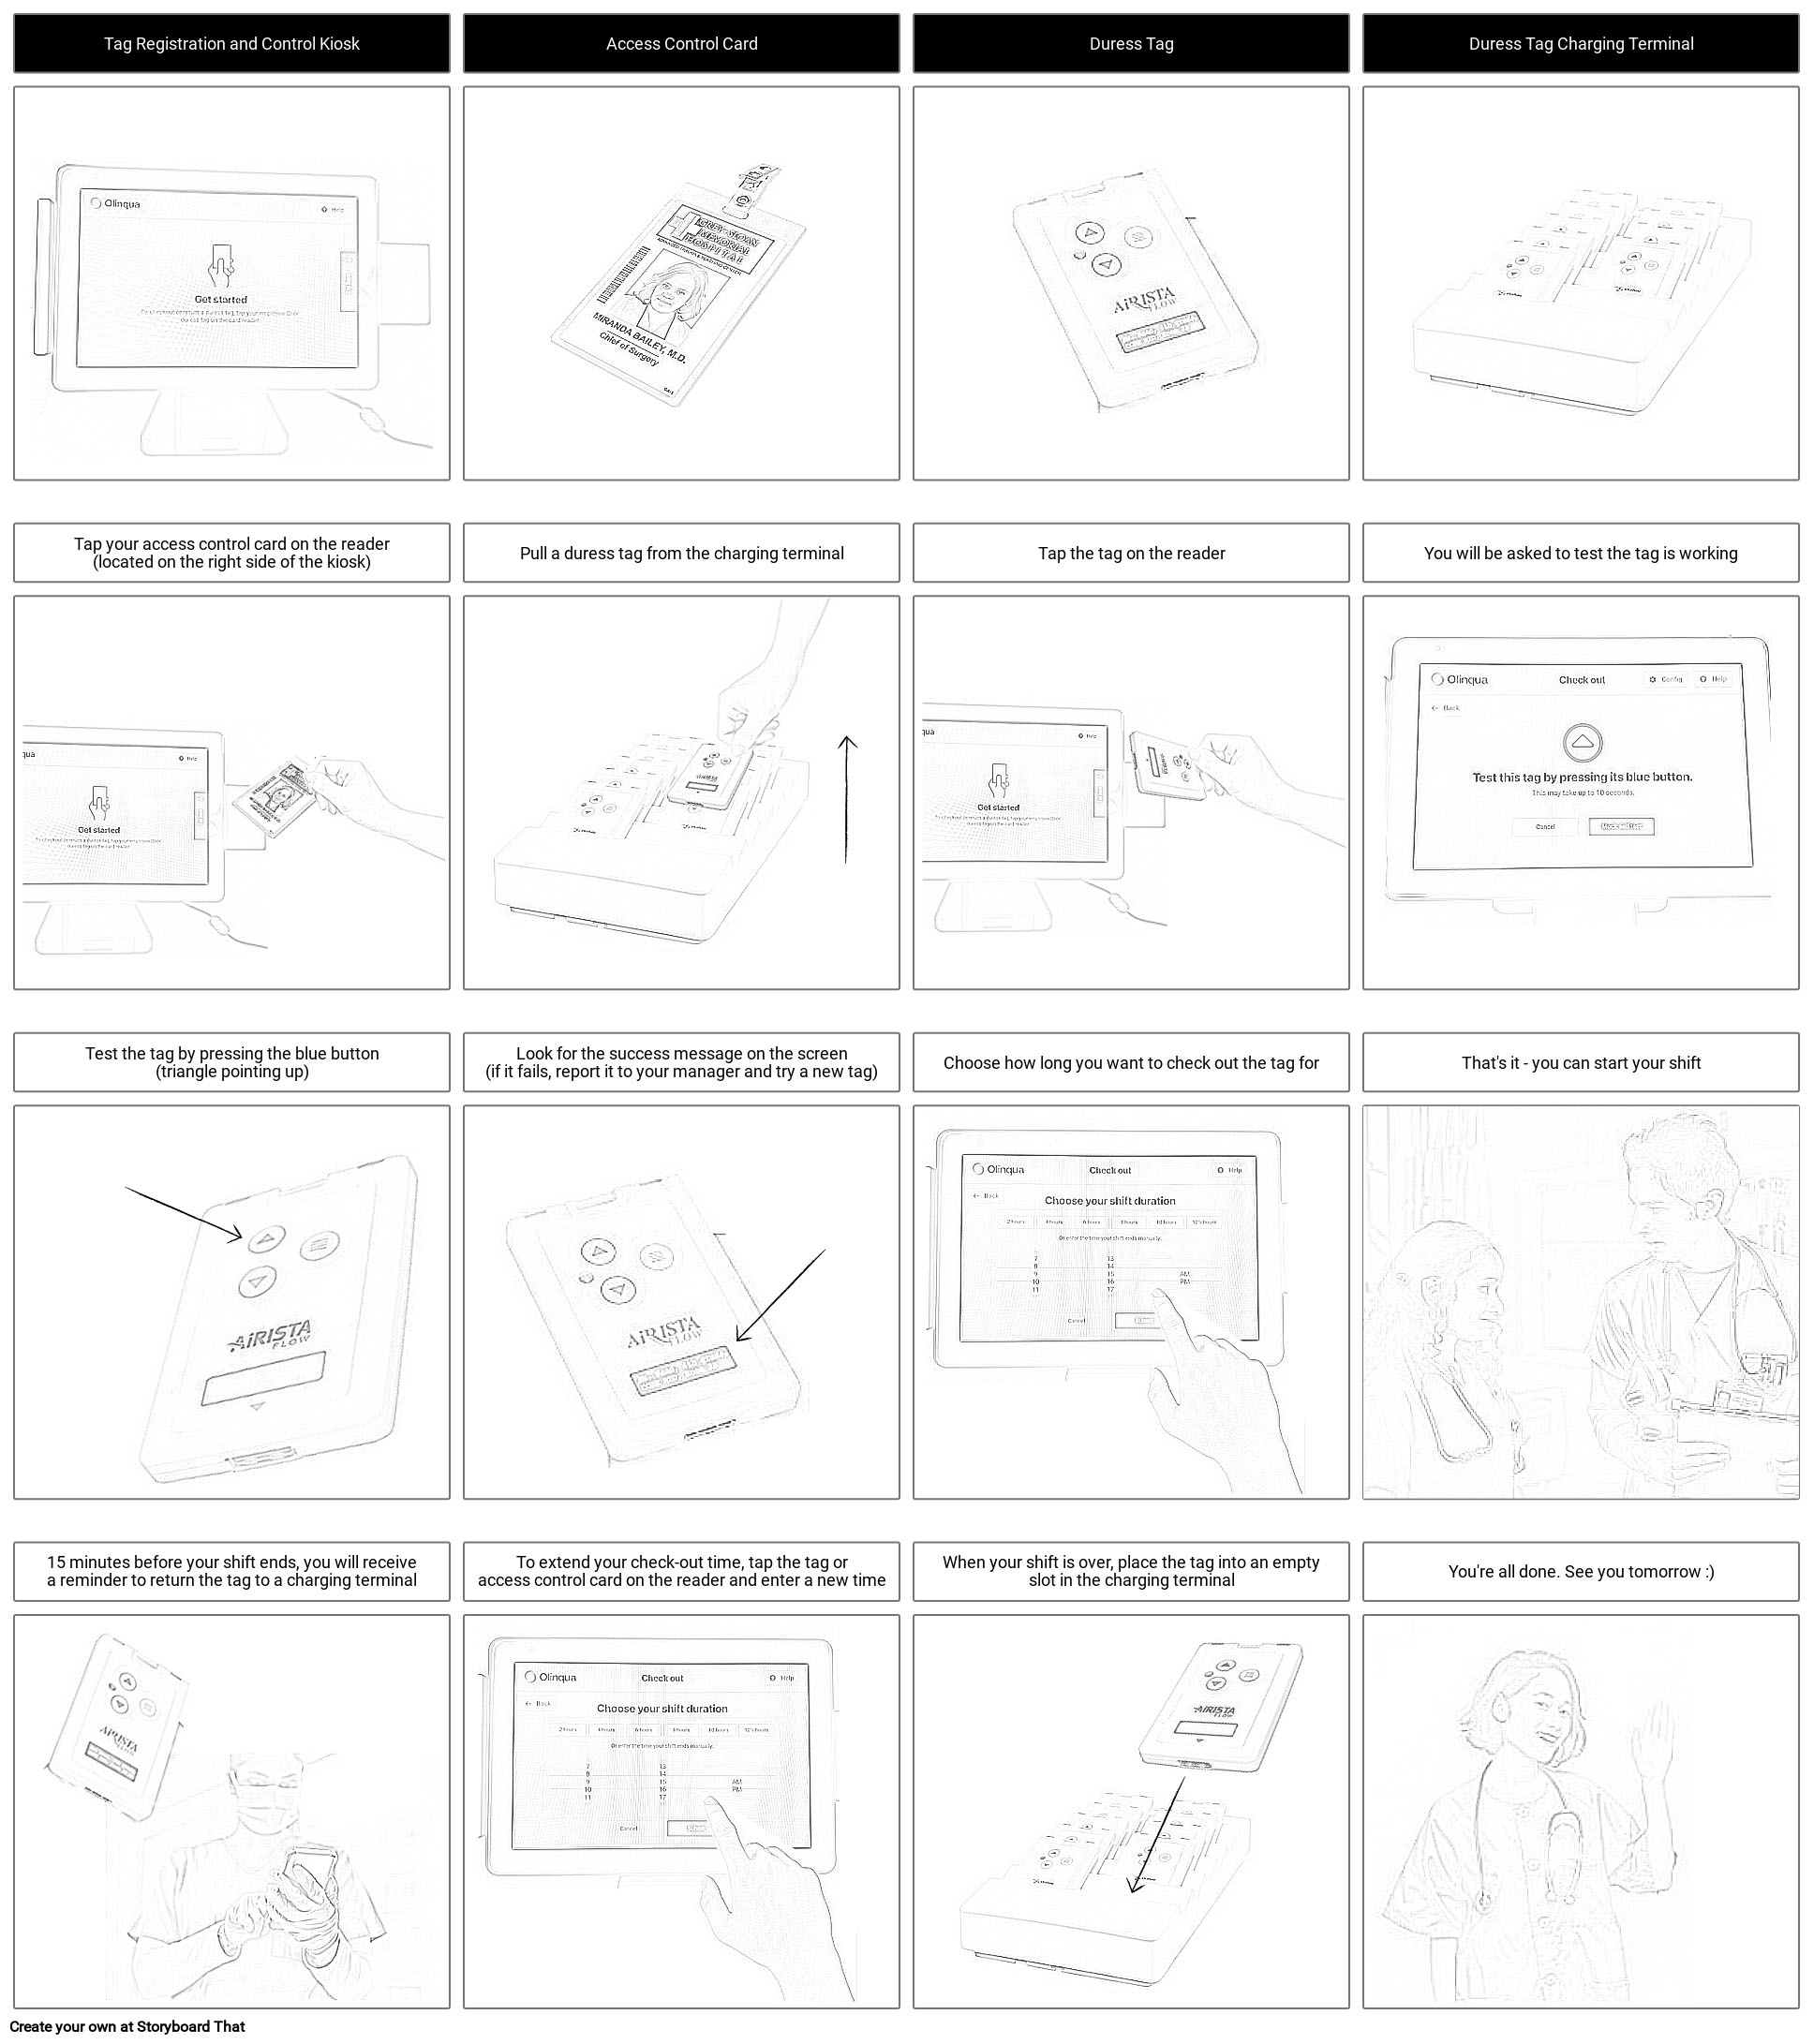
Follow this guide for step-by-step instructions.
PC: Ctrl + to zoom in / Ctrl – to zoom out
Mac: Command + to zoom in / Command- to zoom out

Stuck on a step? Here’s further guidance.

Be sure to check out the FAQs before contacting support – your questions may have already been answered!
The first time you use this system, you will be asked to record your name so we can associate you with the duress tags as you check them in and out.
To get started, tap your ID/access card on the rectangle on the right of the kiosk. You will be asked to enter your full name, using the on-screen keyboard.
From now on, every time you tap your ID/access card, the system will recognise you.
Note: Your name is not shared or used for any purpose other than for your management to review who is checking in and out duress tags at the start and end of shifts.
Step 1. Tap your employee ID/access card on the rectangular reader on the right of the kiosk screen. The light bars will flash green, and you will hear a beep.
Step 2. Pull a duress tag out of the charger and tap it on the same rectangle on the right of the kiosk. The light bars will flash green again and hear another beep.
Step 3. To ensure the duress tag is working, you will be prompted to test it. Press the blue triangle button on the tag. The system will verify the tag is working, and you will see a message pop up on the tag’s screen. (Press the grey menu button to clear the message).
Step 4. If enabled, you can then nominate a shift duration or specific return time. 15 minutes prior to that time, your tag will beep and display a prompt to return the tag at the end of your shift.
That’s it – you have checked out your duress tag and can start your shift.
Step 1. To check your duress tag back in, tap it on the rectangle on the right of the kiosk. You will see a success message on the screen and the light bars will flash green.
Step 2. Tap the button marked “Return tag” and insert the tag back into the charger.
That’s it – go home!
Did you know…You can in fact simply push a checked-out tag back into the charger, and not touch the kiosk! The system will recognise that tag is back on charge, and your record will be updated to show the time you brought it back.
If you need to work a longer period than expected, you can extend the check-out period. There is no need to go through the entire process again and check out a new tag.
Simply tap your duress tag (or your ID card) on the rectangle and select the button marked “Extend my shift”. Enter the new time, and press “Submit”. You will get a reminder 15 minutes before your new end time.
Your safety is our highest priority. Ensuring you have a mobile duress tag while you go about your work helps to ensure that you are protected as much as possible.
Firstly, we want to make sure that everyone is always carrying a tag. Capturing the check-out and check-in activity of staff helps us review and make sure everyone carries a duress tag while on duty. We run occasional reports to review compliance with the duress policy.
We do, however, lose tags. Sometimes they get taken home or just lost. This registration process helps us know who took a tag so we can follow up with you and remind you to bring it back from home, for example.
No problem, just bring it back and put it back in the charger. You should tell your manager you bought it back, too.
If something goes wrong, the light bars will flash red, and you will see an error message on screen. Follow the prompts and it should resolve itself.
Here are a few things you might run into:
Problem: I am trying to tap a duress tag on the rectangle and it’s not registering!
It is important that you tap the little silver sticker on the reader. The sticker is the small rectangle on the back of the duress tag, underneath the barcode.
Hold the tag at the top (where the belt clip is) and tap the bottom of the tag (where the small screen is). Tap it so the back of the duress tag is touching the reader.
Problem: I have a new ID/access card – it’s asked me to enter my name again!
If you have been issued a new ID/access card, you will need to re-enter your name again. It’s not a problem, just tap the new ID card and enter your name and proceed like before.
Did you know… You can pull out a duress tag first, tap that on the scanner, and the kiosk will prompt you to tap your ID/access card – same outcome, just reversing the steps.
Reports are generated in IGNITE, not through the kiosks, themselves.
On a PC, go to the IGNITE portal and log in as usual. Assuming your credentials give you access to the reports tab in IGNIGTE, you will see a tab on the top left called “History”. Click that and navigate to the History screens.
On the left you will see a menu bar. Select “Reports” and then choose “Tag Sessions”.
When the screen loads, choose the dates and other variables, and run the report.
Data may be exported to a .CSV file and opened in Excel or similar.
The RFID (radio frequency identification) stickers are an important part of the process. While they are resilient and unlikely to peel off, sometimes they might, or become damaged, and need to be replaced.
1. In your starter kit will be a supply of extra stickers. To replace one, ensure that the remnants of adhesive where the older sticker was located are fully removed. You may use a cloth with rubbing alcohol or similar to clean it up. Once done, ensure the surface is dry and free of all residue.
Note: Be careful not to let any cleaning fluid enter the tag through the charging port on the base. Do not immerse the tag – use a very small amount to clean the necessary area.
2. Carefully peel a sticker from the provided roll, taking care not to scratch the surface of the sticker, if possible.
3. Place the tag face down on a table and carefully place the sticker in the same spot as the old one.
Note: while it may be tempting, please do not place the sticker elsewhere on the surface of the duress tag. Place it as closely as possible to where it was before. If possible, ensure the edge of the sticker is slightly away (one or two millimetres) from the edge of the tag itself. This just helps avoid the sticker being damaged when it is pushed into the charger unit.
4. On the nearest kiosk, press and hold the Olinqua logo in the top left of the main screen to enter the Settings section. Tap the button labelled “Quick Scan” and follow the on-screen steps:
a. Tap the tag on the reader on the right to scan the new sticker into the system – the same as when using the check-out process normally. It will beep when it registers.
b. With the tag facing you, hold the tag a few centimetres in front of the barcode scanner located on the bottom of the kiosk. Just like in a shop, this barcode scanner emits a red light that will read the barcode located on the back of the tag. Once it reads it, it will beep to show success. You might need to move it around a little to get it to read the barcode.
That’s it. That tag is now registered in the system and can be placed in the charger. You may continue with other tags if required or simply press the button labelled “Return Home” to go back to the main menu.
If a tag is reported as failing to do a successful self-test, it should be set aside until you can test it again. Make sure the tag is charged sufficiently, and then go through the self-test process. Firmly press the blue button (upward-facing triangle) on the tag. The system will perform a soft self-test. If it is working, a “success” message will be shown on the tag, and it will display the current location. If the success message is shown, and the location displayed is accurate, then tag may be considered to be fully working, and may be returned to general use.
If it fails then it should be set aside and the issue reported for evaluation by either the vendor you purchased the system through, or direct to Olinqua on support@olinqua.com.
If a duress tag is reported as faulty, it should be set aside and the issue reported for evaluation by either the vendor you purchased the system through, or direct to Olinqua on support@olinqua.com.
If one of the kiosks is not working, first check it is plugged into power. If it is not, then plug it in, and the system should boot up automatically.
If the kiosk is still not working, please email us on support@olinqua.com with any details you can and your contact information. A support ticket will be created, and a technician will contact you to help troubleshoot the problem.
For help getting started and setting up, call or email Technical Support:
support@olinqua.com
Call us: (03) 9674 7188
Partnering with leading healthcare settings to connect people and systems, for better patient care.
Enabling clinical and operational teams to communicate, manage tasks, and feel safer at work.
Facilitating secure messages, media management and communication.